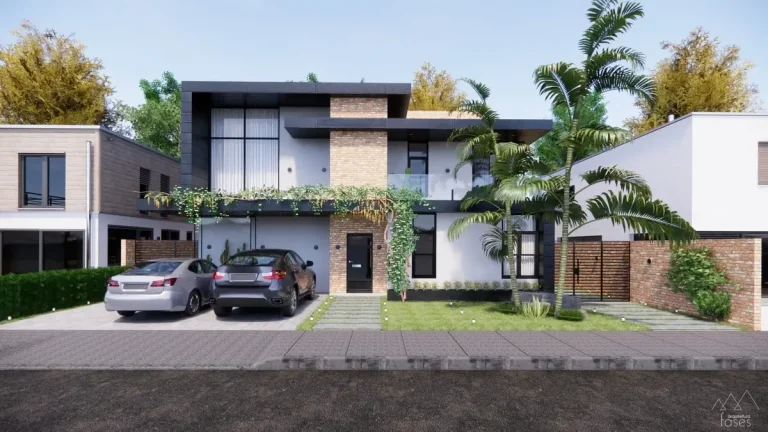
Rendering is a crucial skill for designers across industries, helping turn conceptual ideas into lifelike visualizations. A compelling rendering can win clients, communicate ideas clearly, and elevate the quality of any project. Whether you’re working in architecture, interior design, landscape design, or product development, mastering the art of realistic renderings is essential.
In this post, we’ll explore practical tips, tricks, and tools to create realistic renderings that captivate and inspire.
What is rendering?
Rendering is the process of generating a photorealistic or non-photorealistic image from a 3D model using specialized rendering software. It’s important because it transforms conceptual designs into visual representations, helping designers communicate ideas, impress clients, and showcase their work effectively.
Creating Realistic Renderings: Tips and Tricks for Designers
Learn 10 expert tips for creating stunning, realistic renderings. Master lighting, textures, and post-processing techniques to elevate your designs.
Realistic rendering tips
1. Start with a Strong 3D Model
A great rendering begins with a solid 3D model. Ensure your model is:
- Accurate: Double-check proportions, dimensions, and details.
- Well-Optimized: Clean up stray edges, unnecessary geometry, and overlapping faces. Use tools like CleanUp³ for SketchUp to tidy your model.
- Detailed: Add realistic elements, such as furniture, fixtures, and textures, to bring your scene to life.
Tip: Avoid overloading your model with excessive detail. Strike a balance to maintain performance while retaining visual quality.
2. Use High-Quality Textures and Materials
The textures and materials you apply to your 3D model play a pivotal role in realism.
- Resolution: Use high-resolution textures to prevent blurriness.
- Material Libraries: Leverage free or premium libraries, such as Poliigon or SketchUp Textures Club, for photorealistic materials.
- UV Mapping: Ensure textures are mapped correctly. Use UV mapping tools to adjust scale, rotation, and alignment.
Tip: Add subtle imperfections like scratches, fingerprints, or weathering to surfaces for a more realistic touch.

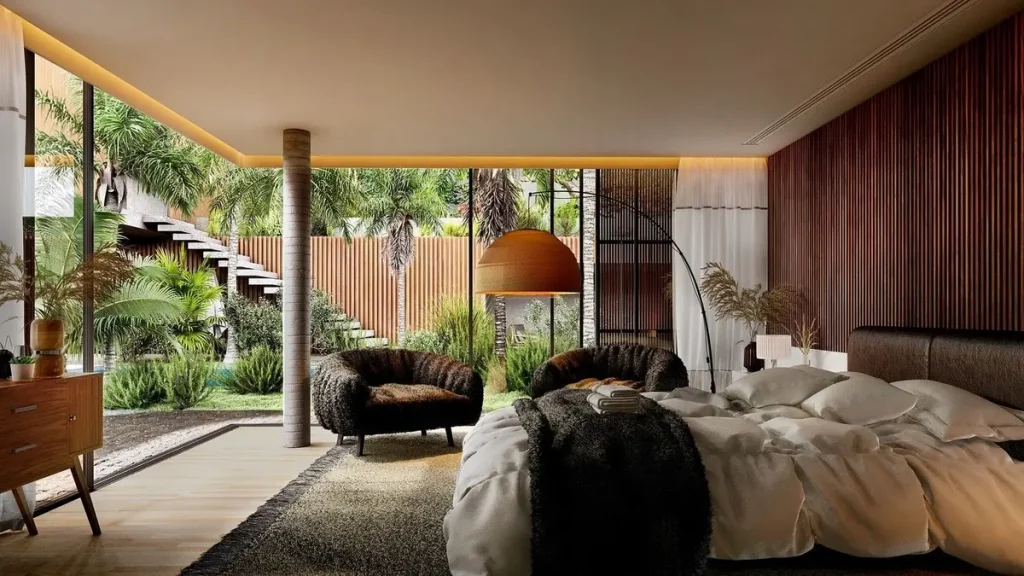
3. Master Lighting Techniques
Lighting is one of the most critical elements of realistic renderings. Consider these lighting techniques:
- Natural Lighting: Simulate sunlight by adjusting time of day and geographic location in your rendering software.
- Artificial Lighting: Add realistic interior lighting fixtures like lamps, spotlights, and LEDs.
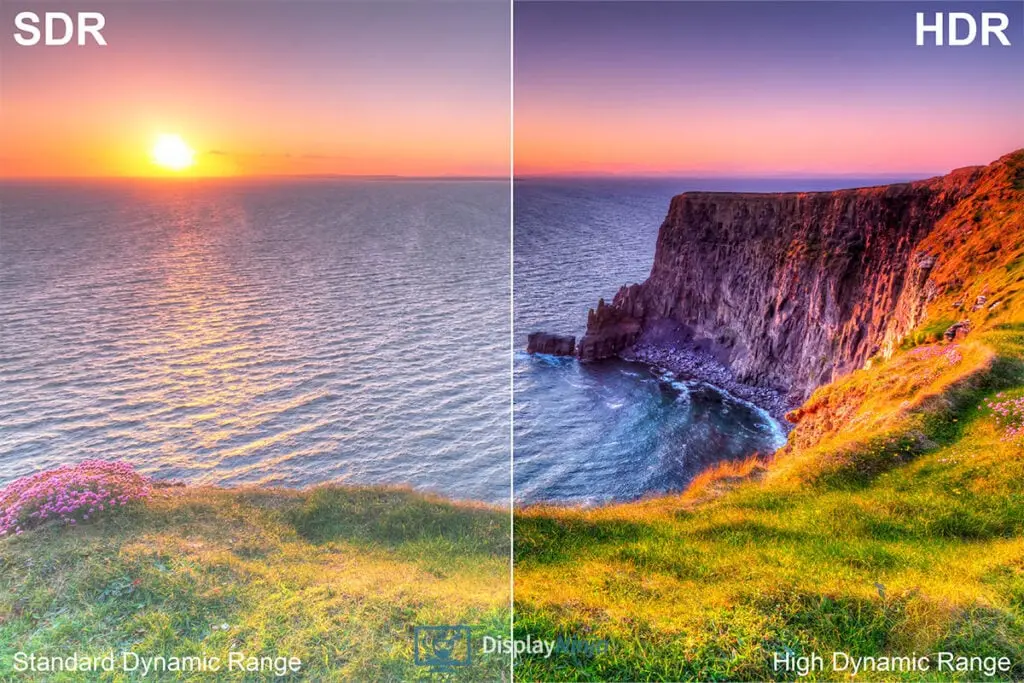
- HDRI Environments: Use High Dynamic Range Images (HDRIs) for realistic sky and environment lighting.
Tip: Avoid overexposure or underexposure. Use a combination of lights to create balanced illumination and realistic shadows.
4. Leverage Camera Settings
Treat your rendering like a photograph. Most rendering software includes camera settings for realistic perspectives. Adjust:
- Field of View (FOV): Match it to human vision for natural compositions.
- Depth of Field (DOF): Add blur to objects outside the focal point for a photographic look.
- Camera Angles: Choose dynamic viewpoints to highlight key features of your design.
Tip: Study photography basics to understand framing, composition, and perspective.
5. Focus on Rendering Engine Settings
The rendering engine you use has a significant impact on the final output. Popular engines like V-Ray, Lumion, Enscape, and Twinmotion offer robust tools for photorealism. Optimize settings like:
- Global Illumination (GI): Enhances light reflection for a natural look.
- Ambient Occlusion (AO): Adds depth and softens shadows.
- Sampling: Increase samples to reduce noise and improve clarity.
Tip: Experiment with presets and save your settings for future projects.
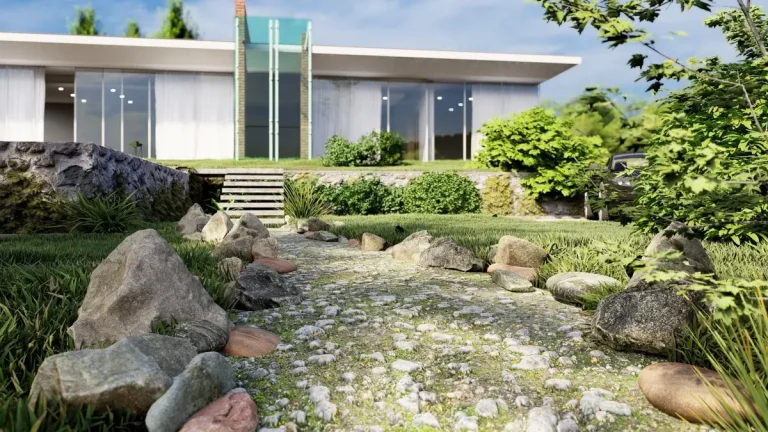
6. Add Realistic Details
The devil is in the details when it comes to rendering. Incorporate:
- Realistic Props: Add small elements like books, plants, and personal items for lived-in realism.
- Texture Variation: Break repetition by slightly varying textures on walls or furniture.
- People and Movement: Use 3D or 2D figures to add scale and context to your scene.
Tip: Use scatter tools like Skatter or built-in libraries to populate scenes with vegetation or clutter.
7. Post-Processing Magic
Even with perfect rendering, post-processing can elevate your visuals. Use software like Adobe Photoshop, Affinity Photo, or GIMP for:
- Color Correction: Adjust brightness, contrast, and color balance.
- Adding Effects: Enhance lighting with flares, bloom, or glow.
- Noise Reduction: Clean up grainy areas.
Tip: Maintain subtlety in post-processing. Overediting can make renders look unnatural.
8. Use Reputable Assets and Resources
High-quality models, textures, and HDRIs can make or break your rendering. Some reliable resources include:
- Textures: Poliigon, Texture Haven, SketchUp Texture Club
- HDRIs: HDRI Haven, HDRMAPS
- 3D Models: TurboSquid, 3D Warehouse, Archibase
Tip: Organize your asset library to save time on future projects.
9. Get Feedback and Iterate
Share your renderings with peers, clients, or online communities to get constructive feedback. Platforms like Behance and ArtStation are excellent for inspiration and critique.
Tip: Use feedback to identify areas for improvement, such as lighting, realism, or composition.
10. Practice, Patience, and Experimentation
Rendering is both an art and a science. Experiment with different settings, techniques, and tools to find your unique style.
Tip: Keep learning by exploring tutorials on platforms like YouTube, Lynda, or Skillshare.
What is the best software for realistic renderings?
Some of the most popular rendering software options include:
- V-Ray (for detailed photorealism)
- Lumion (for quick, immersive renders)
- Enscape (real-time rendering)
- Twinmotion (fast and interactive visuals)
- Blender (free, open-source option with advanced tools)
The best choice depends on your specific needs, budget, and project requirements.
FAQs
Q: Why do my renderings look flat or unrealistic?
Common reasons include:
- Poor-quality textures or materials.
- Incorrect lighting setups, leading to harsh shadows or overexposed areas.
- Lack of detail or context in the scene.
- Absence of post-processing to enhance colors and depth.
Focus on these areas to improve the realism of your renderings.
Q: How do I add people or movement to my renderings?
Use resources like Renderpeople, Maxtree, or 3D Warehouse for realistic 3D people models. For animated scenes, rendering engines like Lumion or Twinmotion allow you to add moving characters or objects.
Q: What’s the biggest mistake beginners make in rendering?
Beginners often focus too much on rendering settings and neglect the basics, such as:
- Poor 3D modeling or inaccurate proportions.
- Overusing effects like bloom or glare.
- Failing to incorporate details that make scenes feel realistic.
Q: What are HDRIs, and how do they improve renderings?
High Dynamic Range Images (HDRIs) are panoramic images that contain detailed lighting and color data. They’re used as environmental maps in rendering software to create realistic lighting, reflections, and backgrounds.
Q: Do I need a high-performance computer for rendering?
Rendering can be resource-intensive, so a high-performance computer is recommended, especially for photorealistic renders. Key components include:
- A powerful GPU (Graphics Processing Unit) for faster rendering.
- Adequate RAM (16GB or more).
- A multi-core CPU for processing complex scenes.
Q: How long does it take to create a realistic rendering?
The time required depends on the complexity of your scene, the level of detail, and your hardware. On average:
- Basic renders can take minutes to hours.
- Photorealistic renders may take several hours or even days, depending on the resolution and quality settings.
Conclusion
Creating realistic renderings takes time, effort, and a combination of technical and artistic skills. By mastering your modeling, lighting, texturing, and post-processing techniques, you can produce stunning visuals that communicate your vision effectively.
What are your go-to tricks for achieving realism in renderings? Share your thoughts and favorite tools in the comments below!